Browse Wiki
All Assembly Guides

LBS23 RCD Cable Assembly Guide

LBS23 RCD केबल असेंबली गाइड

This guide covers the full LBS23 inline RCD cable assembly workflow: prepare both cable ends, open the housing, terminate the conductors on the RCD, secure the clamping hardware, close the enclosure, and retest the charger electrically.

यह गाइड LBS23 inline RCD केबल असेंबली की पूरी प्रक्रिया को चरणबद्ध रूप में समझाता है: दोनों केबल सिरों की तैयारी, हाउसिंग खोलना, RCD पर कंडक्टर टर्मिनेट करना, क्लैम्पिंग हार्डवेयर सुरक्षित करना, एनक्लोजर बंद करना और चार्जर का दोबारा विद्युत परीक्षण करना।

Step Navigator

Open the exact step you need or follow the complete sequence from start to finish.

Important Labels

Match these markings exactly whenever they appear on the terminal images or the product body.

LINELOADNGL
STEP 1

Prepare the AC plug-side cable

एसी प्लग-साइड केबल तैयार करें

Step Images
LBS23 AC plug-side cable overview
AC plug-side cable before termination Termination से पहले एसी प्लग-साइड केबल
LBS23 AC plug-side cable close-up
Close-up of the prepared plug-side conductors तैयार plug-side conductors का close-up
LBS23 plug-side cable dimension diagram
Dimension diagram for stripping and tinning Stripping और tinning के लिए माप आरेख
English

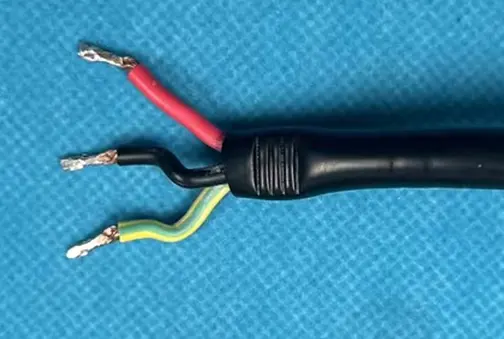
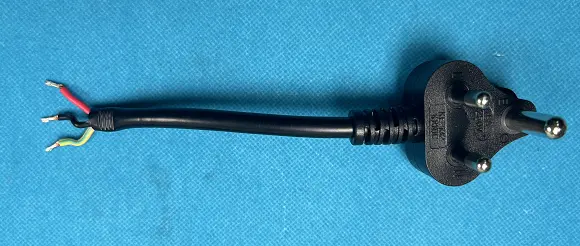
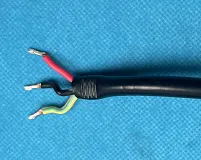
Strip the AC plug-side cable and tin the conductor ends exactly to the specified dimensions before starting the enclosure work.

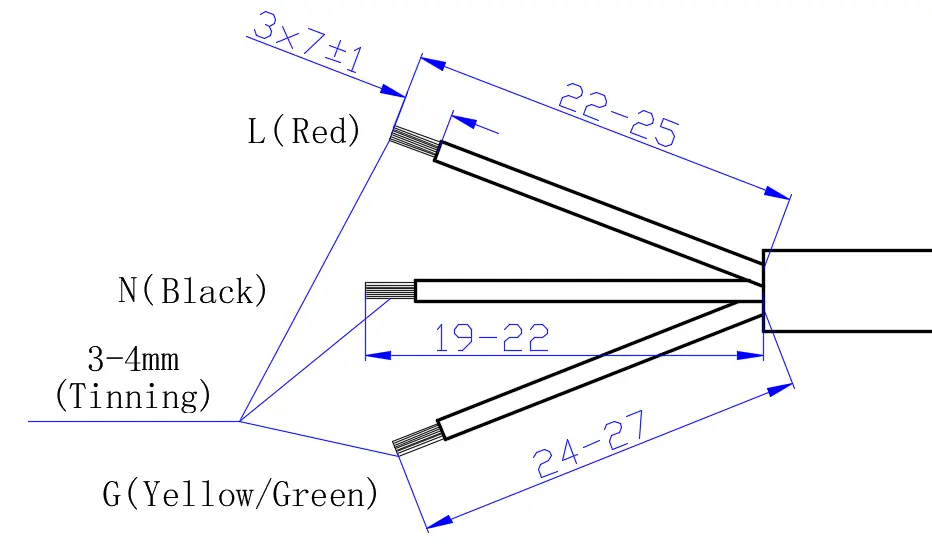
  • Follow the dimension diagram exactly: 3 x 7 ±1 mm stripped section, conductor lengths 22-25 mm / 19-22 mm / 24-27 mm, and 3-4 mm tinning.
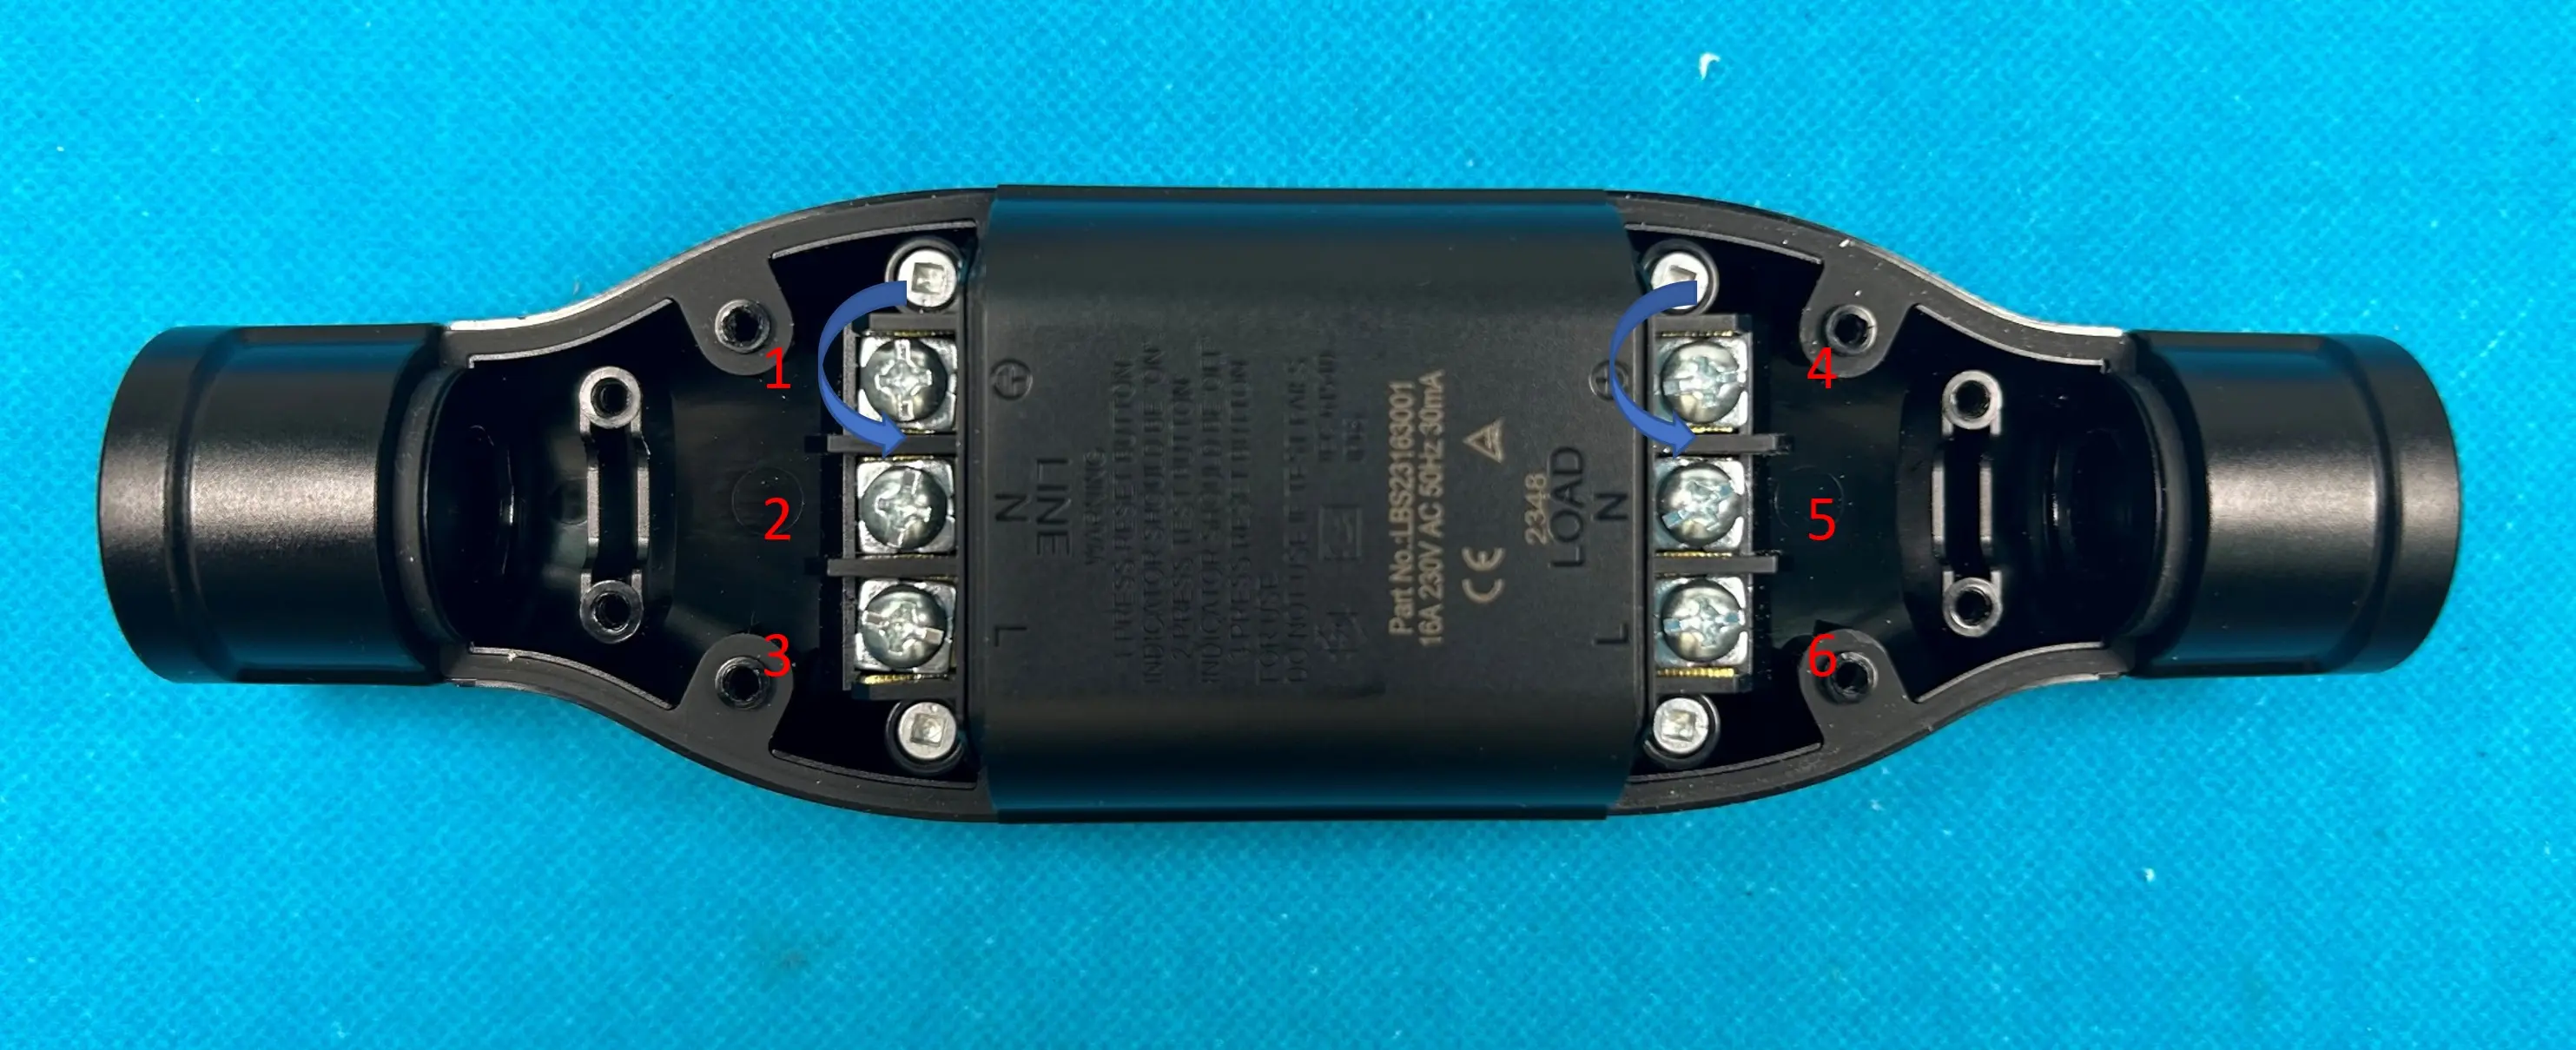
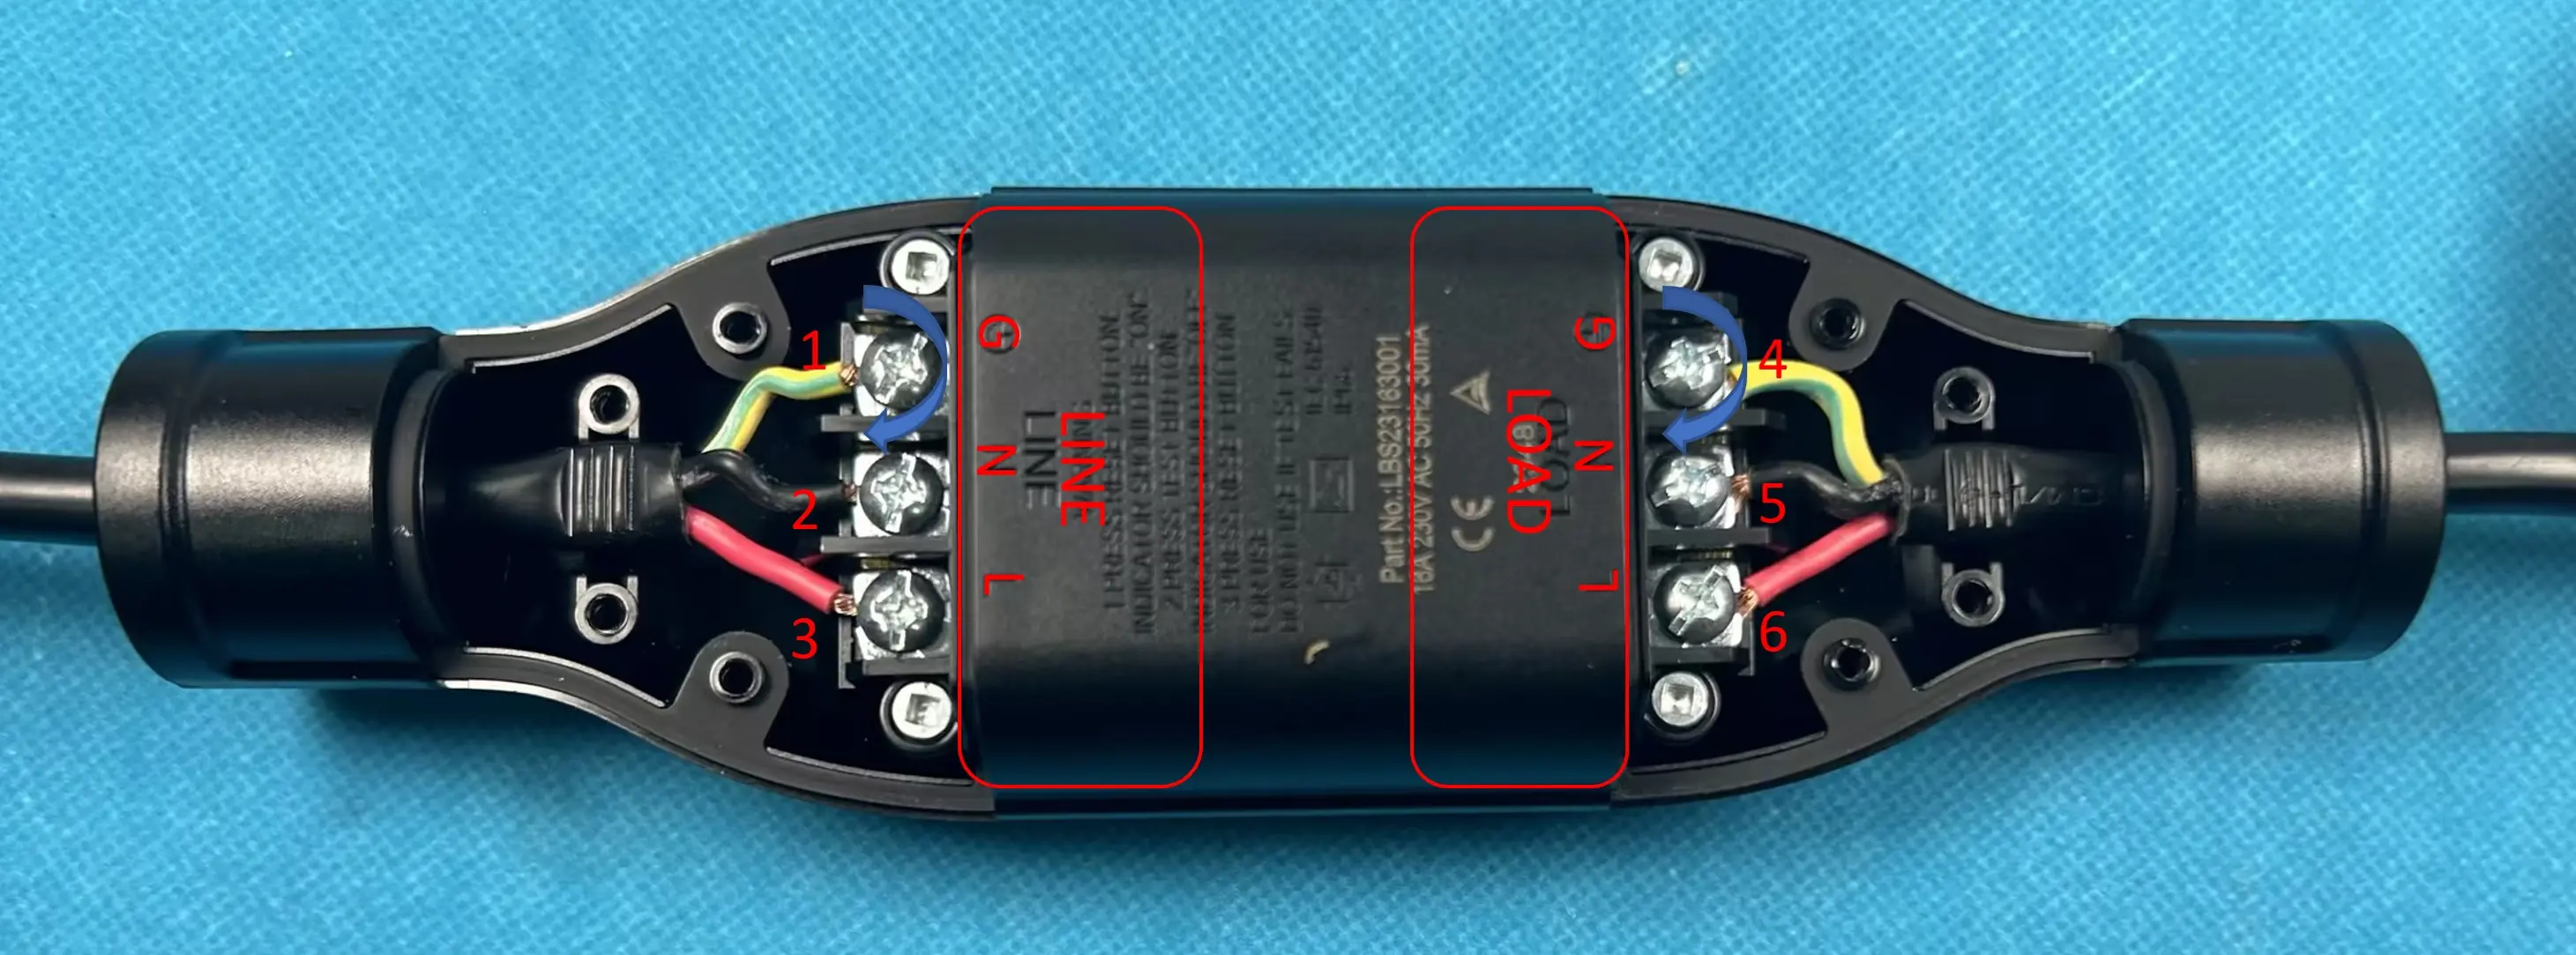
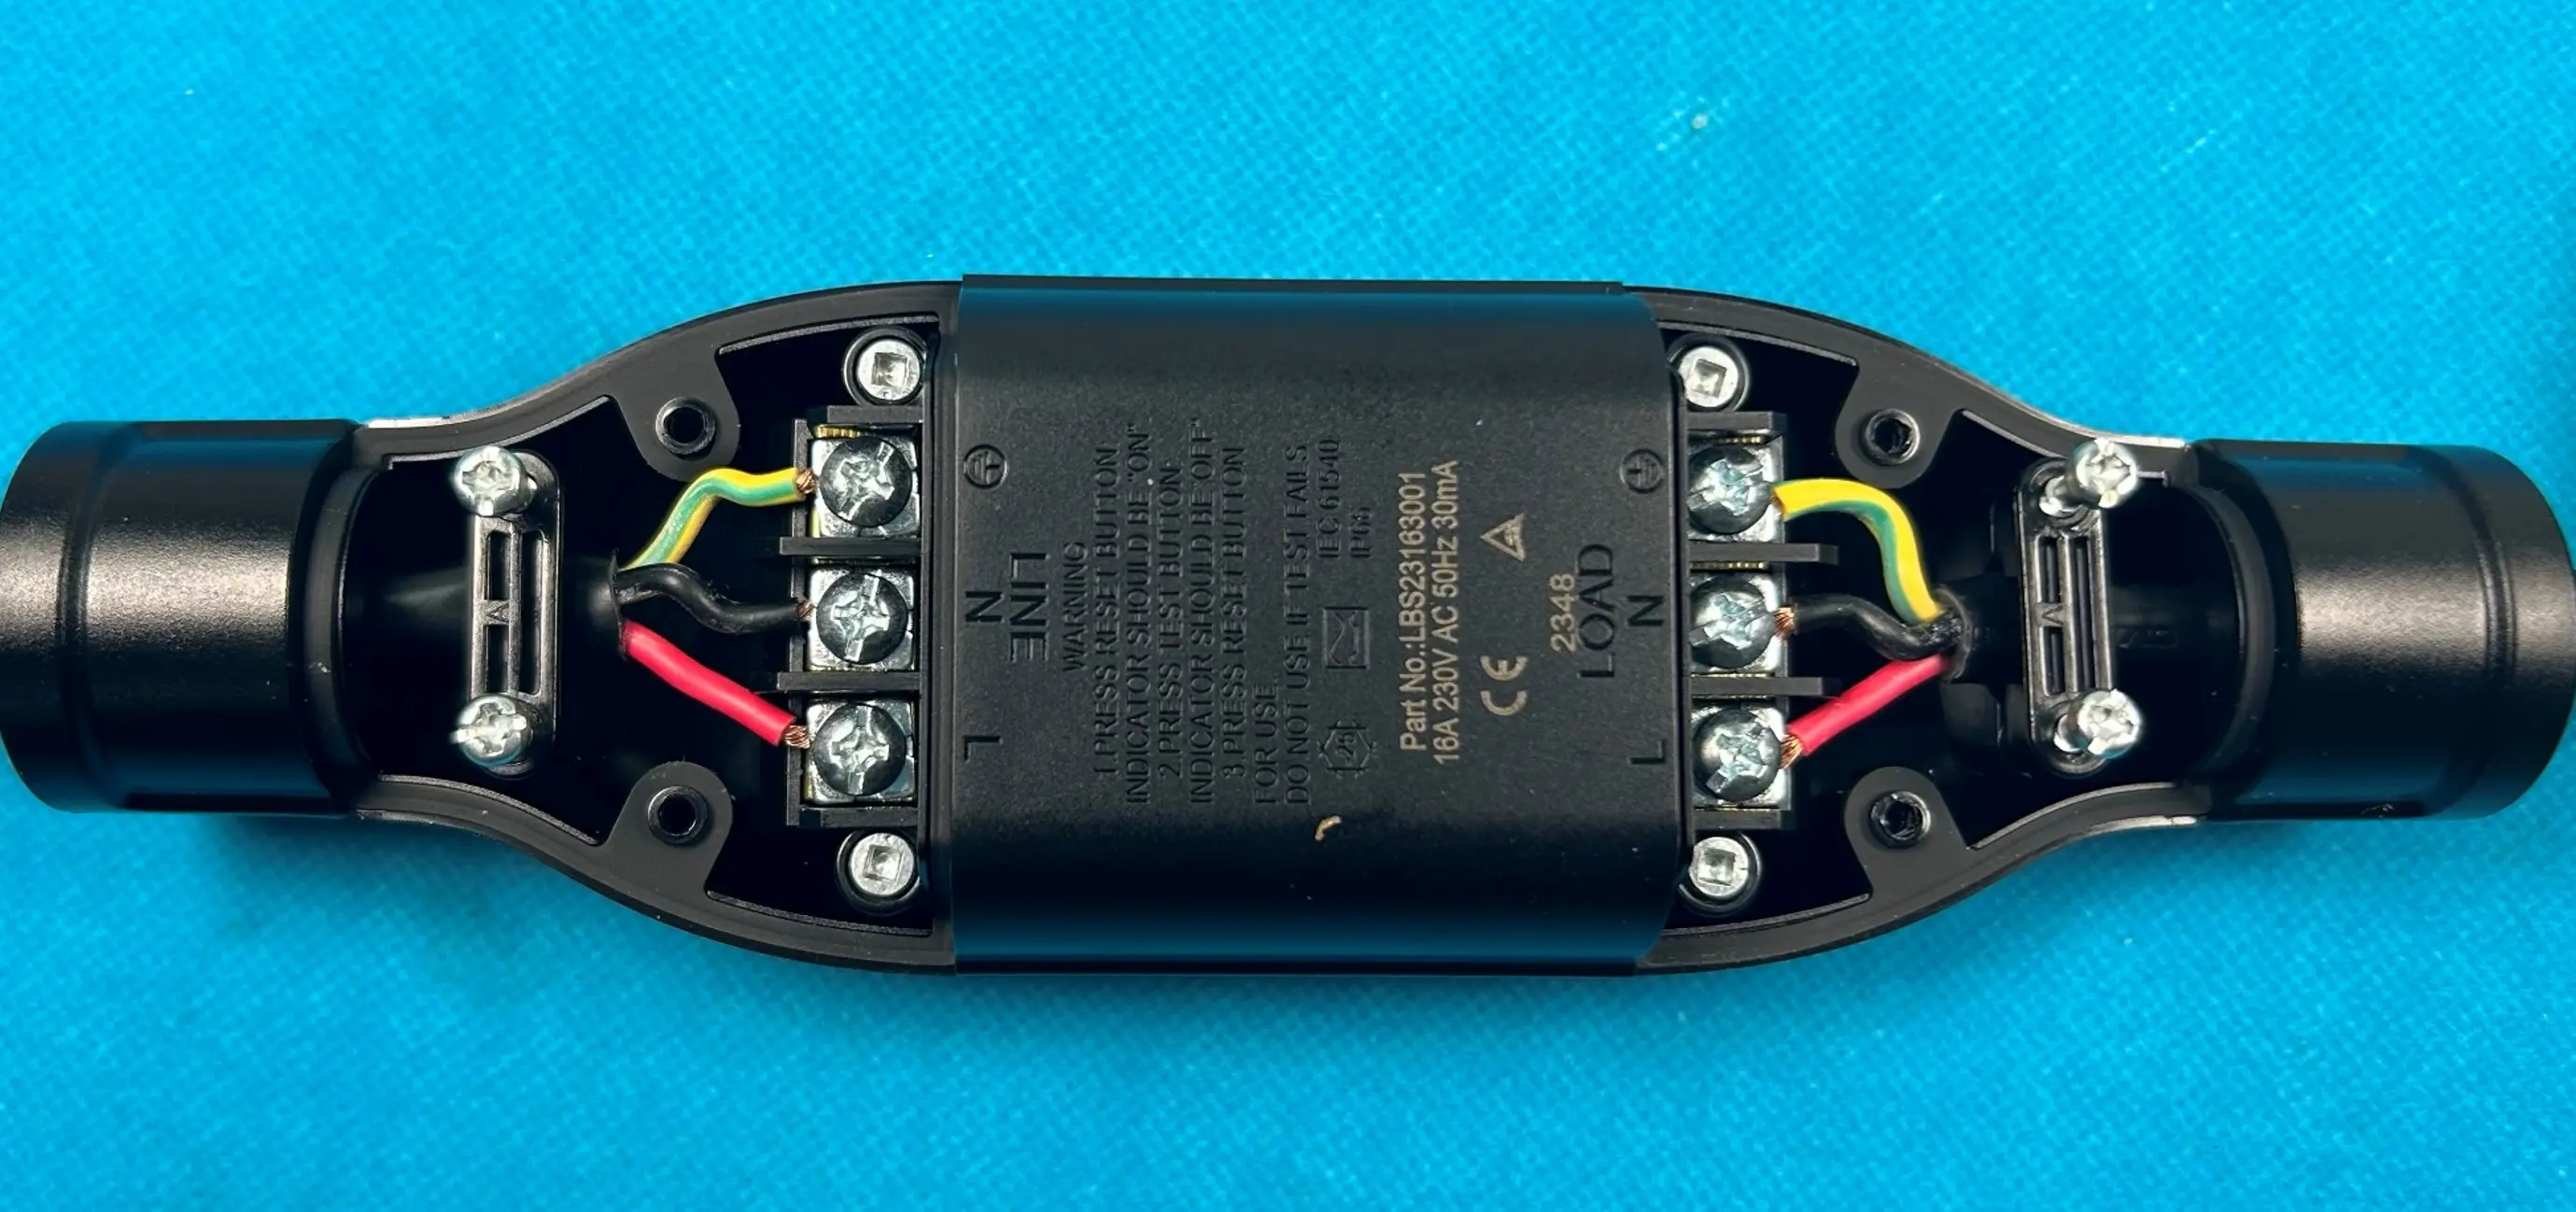
  • Keep the colour mapping unchanged: L = Red, N = Black, G = Yellow/Green.
  • Ensure the tinned ends are neat, compact, and free from loose strands.
Hindi

एनक्लोजर पर काम शुरू करने से पहले एसी प्लग-साइड केबल को दिए गए माप के अनुसार स्ट्रिप करें और कंडक्टर सिरों पर टिनिंग करें।

  • दिए गए माप आरेख का ठीक-ठीक पालन करें: 3 x 7 ±1 mm stripped section, conductor lengths 22-25 mm / 19-22 mm / 24-27 mm, और 3-4 mm tinning।
  • रंग mapping यथावत रखें: L = Red, N = Black, G = Yellow/Green।
  • टिन किए हुए सिरे साफ, कॉम्पैक्ट और बिना ढीले strands के होने चाहिए।
STEP 2

Prepare the charger-side cable

चार्जर-साइड केबल तैयार करें

Step Images
LBS23 charger-side cable close-up
Prepared charger-side cable close-up तैयार charger-side cable का close-up
LBS23 charger-side cable dimension diagram
Shared dimension reference used on the slide स्लाइड पर उपयोग किया गया shared dimension reference
English

Strip and tin the charger-side cable to the same dimensions and tolerance before it is inserted into the RCD housing.

  • Apply the same dimensional preparation shown in the diagram used on the slide.
  • Keep the conductor preparation symmetrical with the plug-side cable so the terminal insertion depth remains consistent.
  • Confirm the tinned ends are smooth and ready for full insertion into the RCD terminals.
Hindi

RCD हाउसिंग में डालने से पहले चार्जर-साइड केबल को उसी माप और tolerance के अनुसार strip और tin करें।

  • स्लाइड पर दिखाए गए आरेख के अनुसार वही dimensional preparation लागू करें।
  • Plug-side cable की तरह ही conductor preparation रखें ताकि terminal insertion depth एकसमान रहे।
  • यह सुनिश्चित करें कि tin किए हुए सिरे smooth हों और RCD terminals में पूरी तरह insert होने के लिए तैयार हों।
STEP 3
Torque 0.8 to 1.2 N·m

Open the bottom RCD housing

Bottom RCD housing खोलें

Visual Guide

Match the marker numbers, labels, arrows, and torque callouts shown on this visual while completing the step.

1
2
3
4
English

Remove the 4 bottom-housing screws and lift the cover housing upward to access the internal assembly.

  • Remove all 4 bottom-housing screws in the sequence shown on the slide.
  • Use the specified torque range for this housing hardware: 0.8 to 1.2 N·m.
  • Retain the 4 screws for the final cover reassembly step.
Hindi

आंतरिक असेंबली तक पहुँचने के लिए bottom housing के 4 screws निकालें और cover housing को ऊपर उठाएँ।

  • स्लाइड पर दिखाए गए क्रम के अनुसार bottom housing के सभी 4 screws निकालें।
  • इस housing hardware के लिए दिया गया torque range उपयोग करें: 0.8 से 1.2 N·m।
  • अंतिम cover reassembly चरण के लिए इन 4 screws को सुरक्षित रखें।
STEP 4
Torque 0.8 to 1.2 N·m

Remove the clamping block

Clamping block निकालें

Visual Guide

Match the marker numbers, labels, arrows, and torque callouts shown on this visual while completing the step.

1
2
3
4
English

Open the 4 clamping-block screws and lift the clamping block upward so both cable entries are free.

  • Remove the 4 screws that secure the clamping block to the lower housing.
  • Use the same housing-hardware torque range: 0.8 to 1.2 N·m.
  • Keep the clamping block and its 4 screws together for reuse after wiring.
Hindi

4 clamping-block screws खोलें और clamping block को ऊपर उठाएँ ताकि दोनों cable entries मुक्त हो जाएँ।

  • Clamping block को lower housing से सुरक्षित रखने वाले 4 screws निकालें।
  • उसी housing-hardware torque range का पालन करें: 0.8 से 1.2 N·m।
  • Wiring के बाद reuse के लिए clamping block और उसके 4 screws को साथ सुरक्षित रखें।
STEP 5
Torque 0.75 to 1.0 N·m

Loosen the 6 RCD terminal screws

RCD terminal के 6 screws ढीले करें

Visual Guide

Match the marker numbers, labels, arrows, and torque callouts shown on this visual while completing the step.

1
2
3
4
5
6
English

Loosen all 6 terminal screws on the RCD so the plug-side and charger-side conductors can be inserted in the next step.

  • Open all 6 terminal screws shown in the reference image before inserting any conductor.
  • Use a terminal hardware torque of 0.75 to 1.0 N·m for secure fastening.
  • Keep the terminal orientation visible so LINE / LOAD and N / G / L are not mixed later.
Hindi

अगले चरण में plug-side और charger-side conductors डालने के लिए RCD के सभी 6 terminal screws ढीले करें।

  • कोई भी conductor डालने से पहले reference image में दिखाए गए सभी 6 terminal screws खोलें।
  • Secure fastening के लिए terminal hardware torque 0.75 से 1.0 N·m रखें।
  • Terminal orientation स्पष्ट रखें ताकि बाद में LINE / LOAD और N / G / L mix न हों।
STEP 6

Connect the plug-side and charger-side cables to the RCD terminals

Plug-side और charger-side cables को RCD terminals से जोड़ें

LINELOADNGL
Visual Guide

Match the marker numbers, labels, arrows, and torque callouts shown on this visual while completing the step.

1
2
3
4
5
6
English

Mate the two cable sets to the RCD exactly as shown in the wiring image, preserving LINE / LOAD and terminal order.

  • Connect the AC input plug cable to the LINE side marked on the RCD.
  • Connect the charger-side cable to the LOAD side marked on the RCD.
  • Match N, G, and L exactly as shown, and insert every conductor fully before tightening.
Hindi

Wiring image में दिखाए अनुसार दोनों cable sets को RCD से जोड़ें और LINE / LOAD तथा terminal order को सही रखें।

  • AC input plug cable को RCD पर marked LINE side से जोड़ें।
  • Charger-side cable को RCD पर marked LOAD side से जोड़ें।
  • N, G और L को बिल्कुल दिखाए गए क्रम में मिलाएँ, और tightening से पहले हर conductor को पूरी तरह insert करें।
Critical to quality गुणवत्ता के लिए अत्यंत महत्वपूर्ण

This is the primary orientation checkpoint in the entire rework. A LINE / LOAD swap or N / G / L mismatch will create an unsafe or non-functional assembly.

पूरे rework में यह सबसे महत्वपूर्ण orientation checkpoint है। LINE / LOAD swap या N / G / L mismatch असुरक्षित या non-functional assembly बना देगा।

STEP 7
Torque 0.75 to 1.0 N·m

Tighten the 6 RCD terminal screws

RCD terminal के 6 screws कसें

LINELOADNGL
Visual Guide

Match the marker numbers, labels, arrows, and torque callouts shown on this visual while completing the step.

1
2
3
4
5
6
English

Tighten all 6 RCD terminal screws after verifying that the cable orientation is still correct.

  • Tighten each of the 6 terminal screws evenly so the conductors seat firmly.
  • Use the specified terminal torque: 0.75 to 1.0 N·m.
  • Recheck that plug side remains on LINE and charger side remains on LOAD after tightening.
Hindi

यह verify करने के बाद कि cable orientation अभी भी सही है, RCD terminal के सभी 6 screws कसें।

  • Conductors को मजबूती से seat कराने के लिए सभी 6 terminal screws को समान रूप से कसें।
  • निर्धारित terminal torque का उपयोग करें: 0.75 से 1.0 N·m।
  • Tightening के बाद दोबारा जाँचें कि plug side LINE पर और charger side LOAD पर ही रहे।
STEP 8

Seat the clamping block on both cable entries

दोनों cable entries पर clamping block बिठाएँ

Visual Guide

Match the marker numbers, labels, arrows, and torque callouts shown on this visual while completing the step.

1
2
3
4
English

Press the clamping block back onto the assembled cable on both the AC plug side and the charger side.

  • Position the clamping block so both cable jackets sit correctly in the clamping path.
  • Ensure the block lies flat before the screws are reinstalled.
  • Do not trap, twist, or pinch the cables while seating the block.
Hindi

Clamping block को AC plug side और charger side दोनों पर assembled cable के ऊपर वापस दबाकर बिठाएँ।

  • Clamping block को इस तरह रखें कि दोनों cable jackets सही clamping path में बैठें।
  • Screws दोबारा लगाने से पहले सुनिश्चित करें कि block पूरी तरह flat बैठा हो।
  • Block बिठाते समय cables को trap, twist या pinch न करें।
Critical to quality गुणवत्ता के लिए अत्यंत महत्वपूर्ण

The clamping block provides strain relief on both cable entries. Poor seating here can damage the internal terminations after repeated use.

Clamping block दोनों cable entries पर strain relief देता है। यहाँ गलत seating होने पर बार-बार उपयोग में internal terminations को नुकसान हो सकता है।

STEP 9
Torque 0.8 to 1.2 N·m

Reuse and tighten the 4 clamping-block screws

Clamping block के 4 screws दोबारा लगाकर कसें

Visual Guide

Match the marker numbers, labels, arrows, and torque callouts shown on this visual while completing the step.

1
2
3
4
English

Reuse the 4 screws removed with the clamping block and tighten them after the block is fully seated.

  • Reinstall the 4 screws removed during the clamping-block removal stage.
  • Tighten the screws to 0.8 to 1.2 N·m.
  • Confirm that the block remains flush and both cable jackets stay captured securely.
Hindi

Clamping block के साथ निकाले गए 4 screws को दोबारा लगाएँ और block के पूरी तरह seat होने के बाद कसें।

  • Clamping-block removal चरण में निकाले गए 4 screws को फिर से लगाएँ।
  • Screws को 0.8 से 1.2 N·m torque पर कसें।
  • यह सुनिश्चित करें कि block flush रहे और दोनों cable jackets सुरक्षित रूप से पकड़ी रहें।
STEP 10
Torque 0.8 to 1.2 N·m

Reassemble the cover housing

Cover housing को दोबारा assemble करें

Visual Guide

Match the marker numbers, labels, arrows, and torque callouts shown on this visual while completing the step.

1
2
3
4
English

Refit the cover housing and reuse the 4 screws removed in Step 3 to close the bottom RCD housing.

  • Position the cover housing carefully so no internal wire is displaced or pinched.
  • Reuse the 4 bottom-housing screws from Step 3.
  • Tighten the housing screws to 0.8 to 1.2 N·m.
Hindi

Cover housing को वापस लगाएँ और Step 3 में निकाले गए 4 screws का उपयोग करके bottom RCD housing को बंद करें।

  • Cover housing को सावधानी से रखें ताकि कोई internal wire हिले या pinch न हो।
  • Step 3 के 4 bottom-housing screws को reuse करें।
  • Housing screws को 0.8 से 1.2 N·m torque पर कसें।
STEP 13

Retest the electrical function of the reworked charger

Rework किए गए charger का विद्युत परीक्षण दोबारा करें

Visual Guide

Match the marker numbers, labels, arrows, and torque callouts shown on this visual while completing the step.

1
2
3
4
English

Carry out the electrical function test again after reassembly so the repaired charger is verified before release.

  • Perform the same electrical verification required for a reworked charger before returning it to service.
  • Confirm that the housing is closed, cables are secured, and the charger functions normally.
  • Record the rework completion according to your production or service process.
Hindi

Reassembly के बाद electrical function test दोबारा करें ताकि repaired charger रिलीज़ से पहले verify हो जाए।

  • Charger को सेवा में लौटाने से पहले reworked unit के लिए आवश्यक वही electrical verification करें।
  • यह सुनिश्चित करें कि housing बंद हो, cables सुरक्षित हों और charger सामान्य रूप से कार्य करे।
  • अपने production या service process के अनुसार rework completion दर्ज करें।