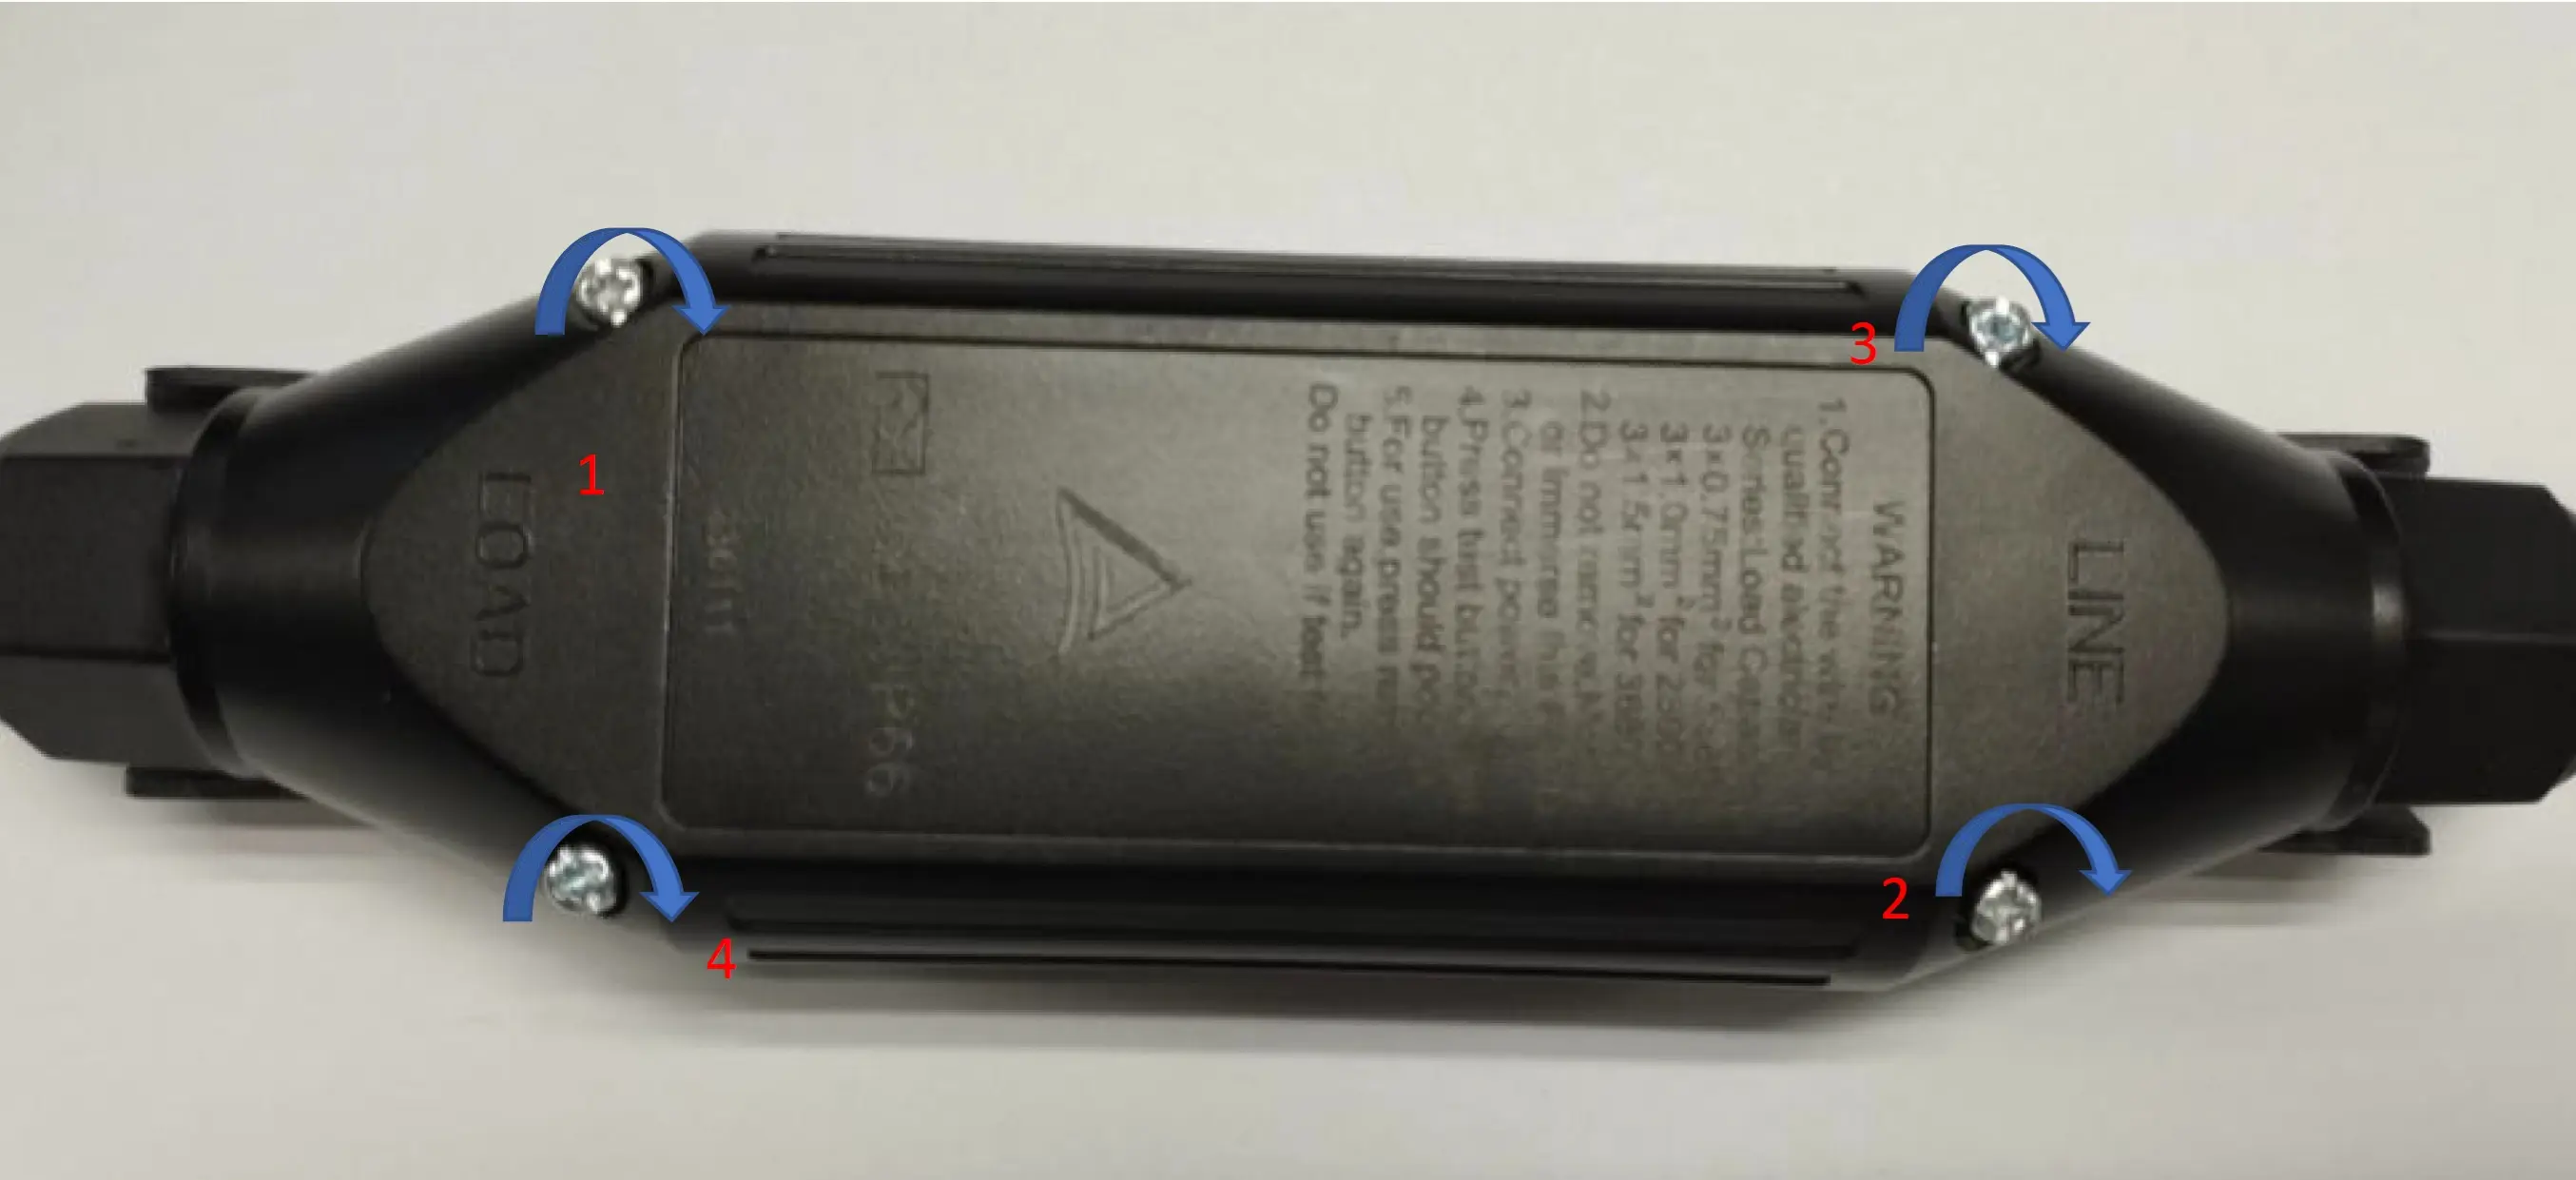
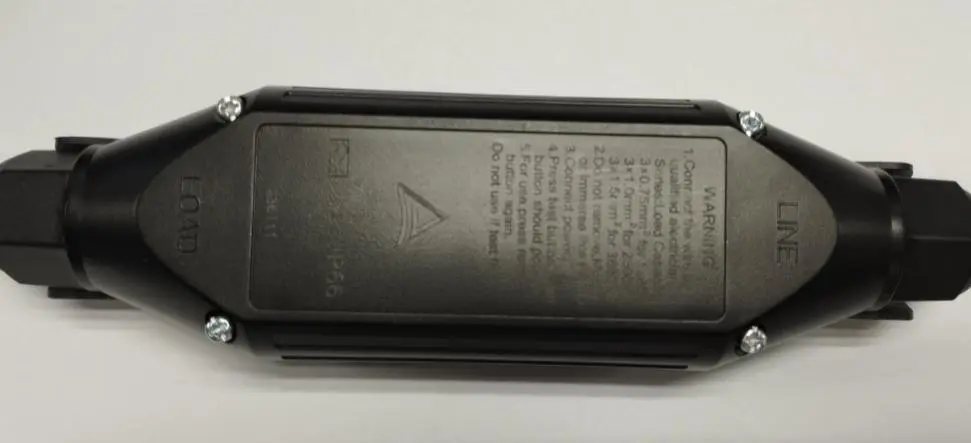
Browse Wiki
All Assembly Guides

P151630-F Cable Assembly Guide

P151630-F केबल असेंबली गाइड

This guide covers the P151630-F cable assembly flow: prepare both cable ends, open the housing, remove and reuse the nut / pressing sleeve / rubber seal set, terminate both cable sets on the RCD, close the housing, and retest the charger electrically.

यह गाइड P151630-F cable assembly flow को चरणबद्ध रूप में समझाता है: दोनों cable ends की तैयारी, housing खोलना, nut / pressing sleeve / rubber seal set को हटाकर फिर उपयोग करना, दोनों cable sets को RCD पर terminate करना, housing बंद करना और charger का दोबारा विद्युत परीक्षण करना।

Step Navigator

Open the exact step you need or follow the complete sequence from start to finish.

Important Labels

Match these markings exactly whenever they appear on the terminal images or the product body.

LINELOADNGL
STEP 1

Prepare the AC plug-side cable

एसी plug-side cable तैयार करें

Visual Guide

Use this visual as the cable preparation and component-order reference for this step.

English

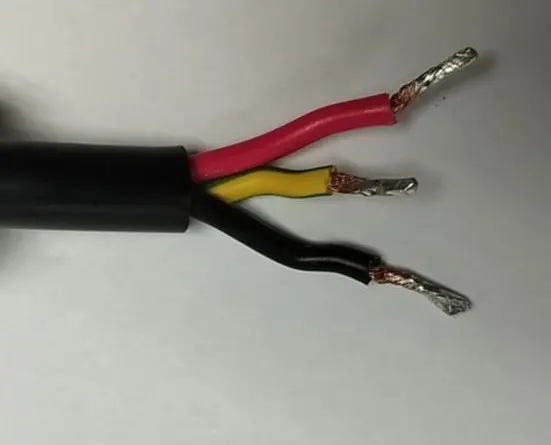
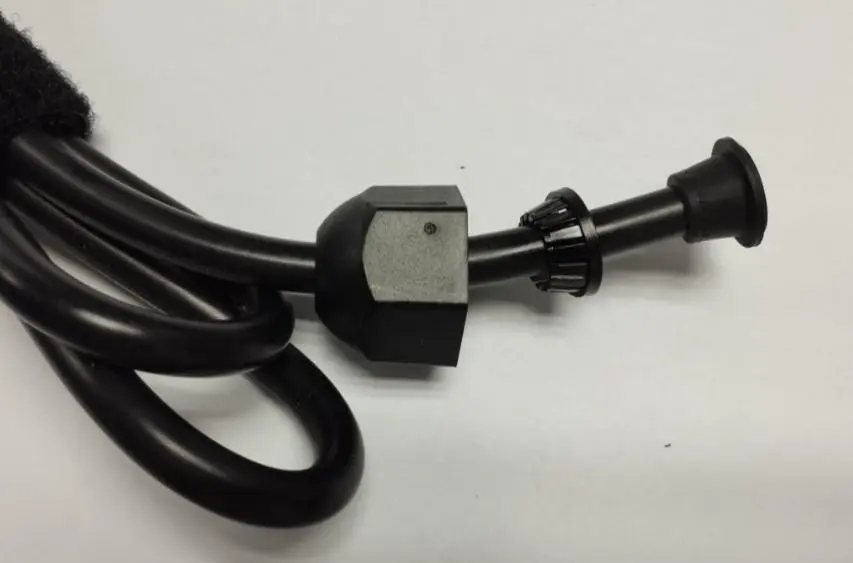
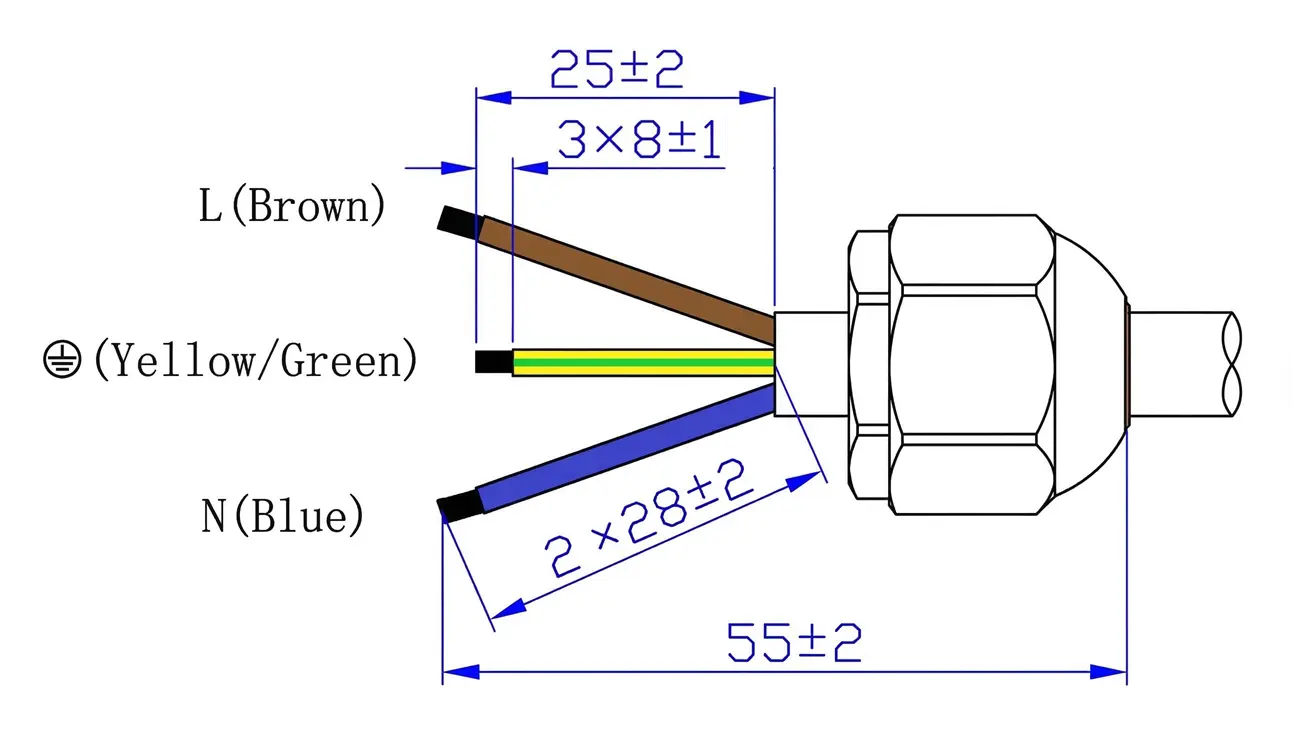
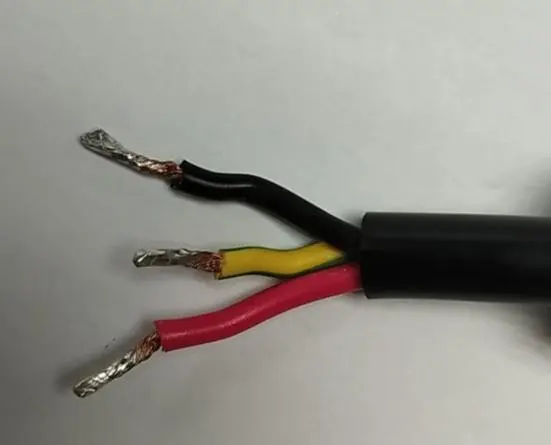
Strip and tin the AC plug-side cable exactly to the specified dimensions before any housing hardware is opened.

  • Follow the dimension diagram exactly: overall prepared section 55 ±2 mm, 3 x 8 ±1 mm stripped ends, 25 ±2 mm upper conductor reference, and 2 x 28 ±2 mm lower conductor reference.
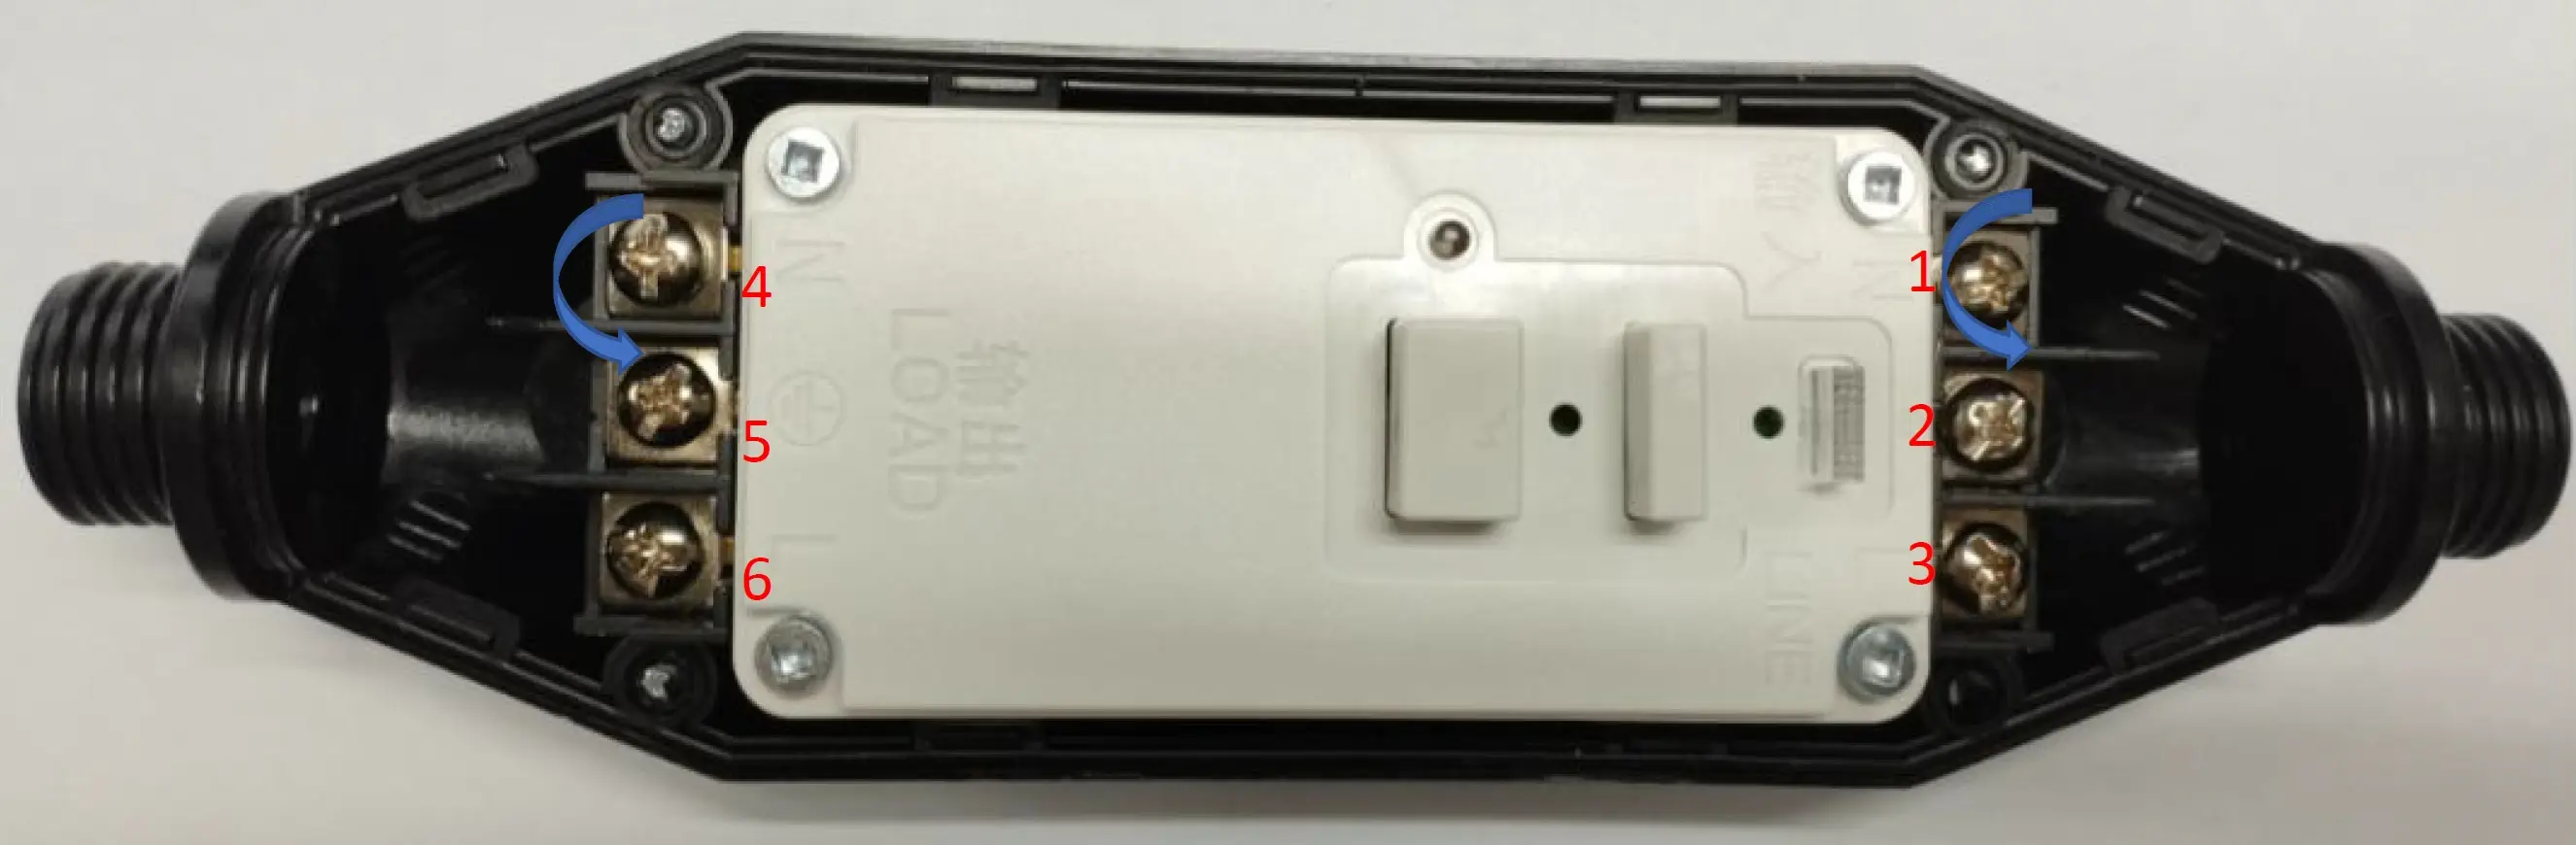
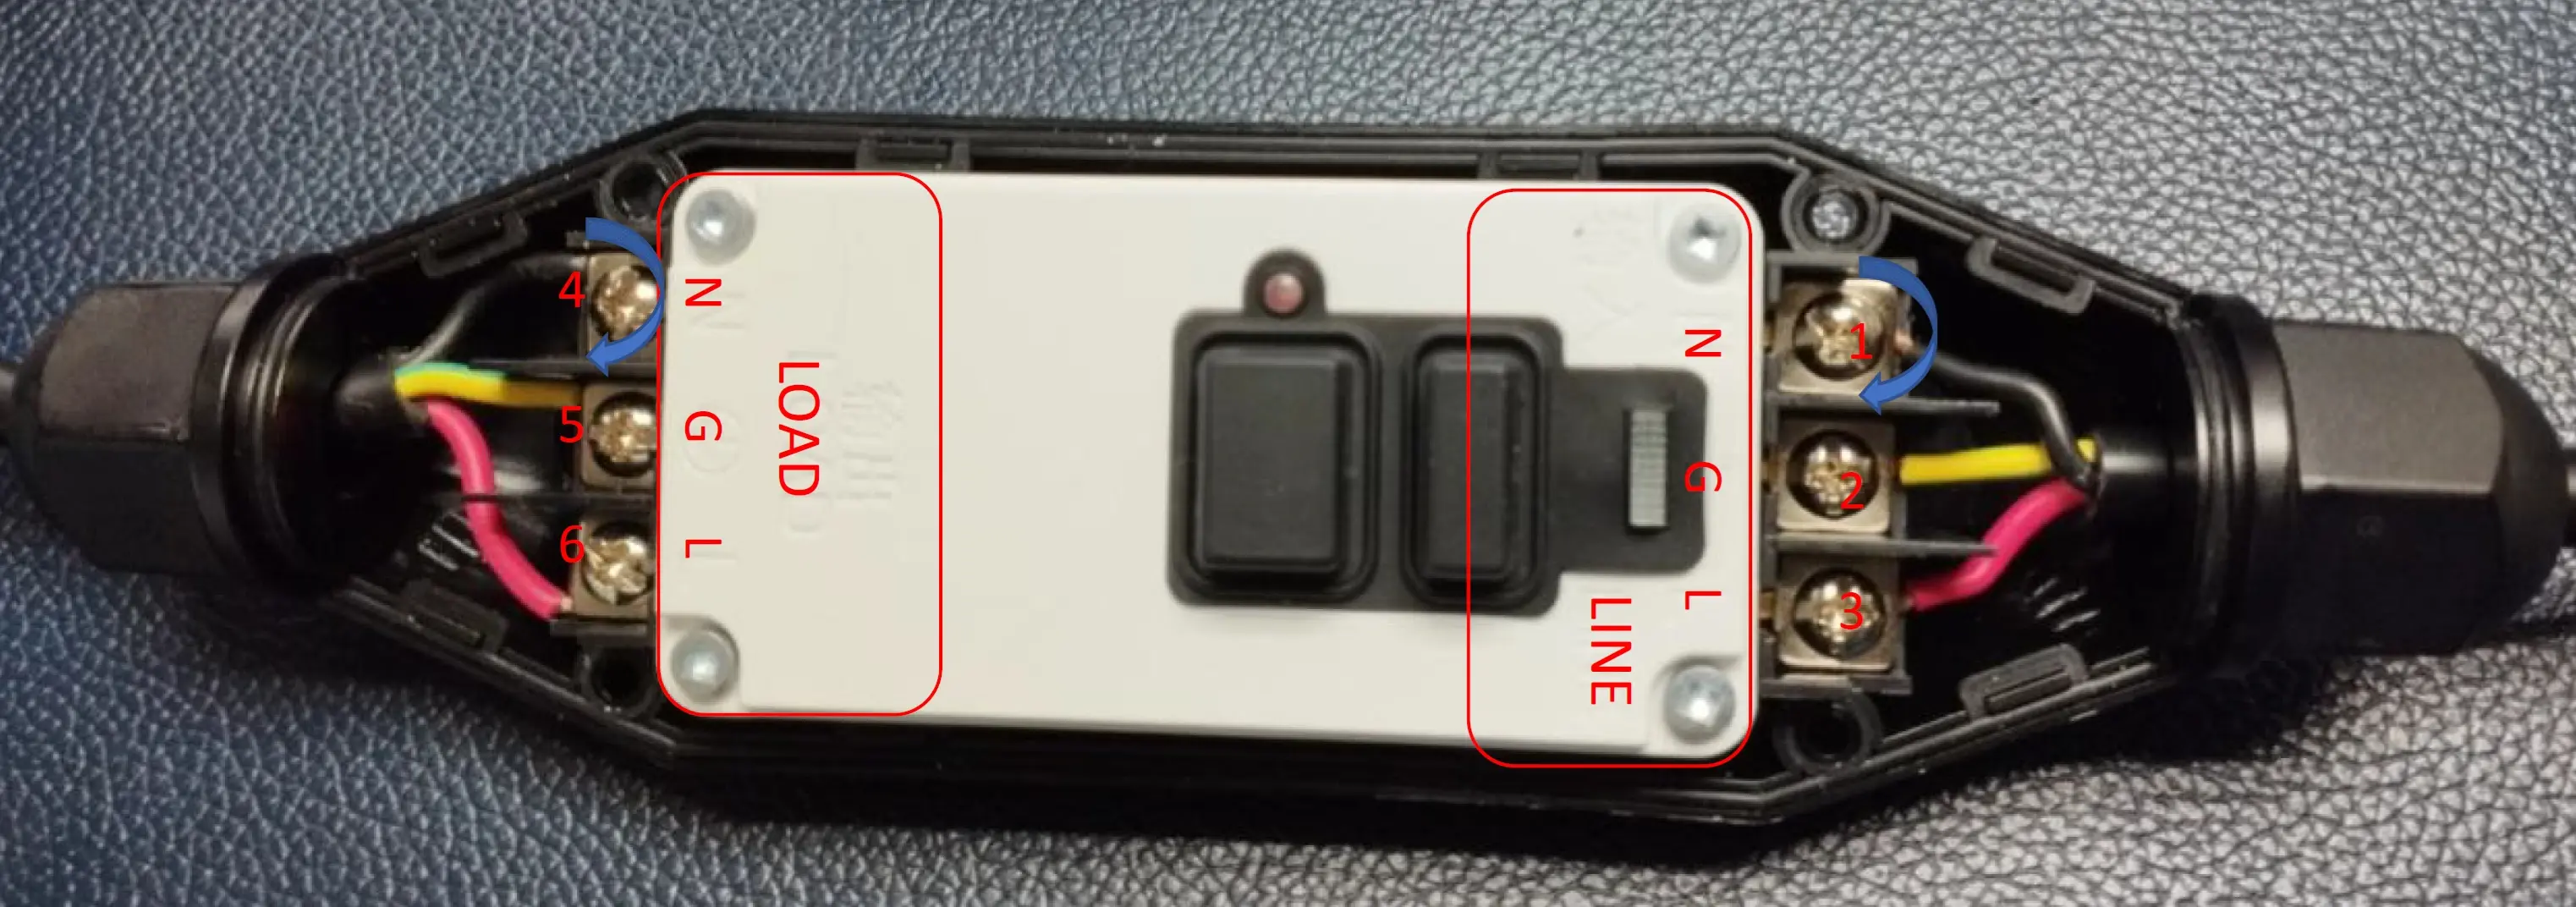
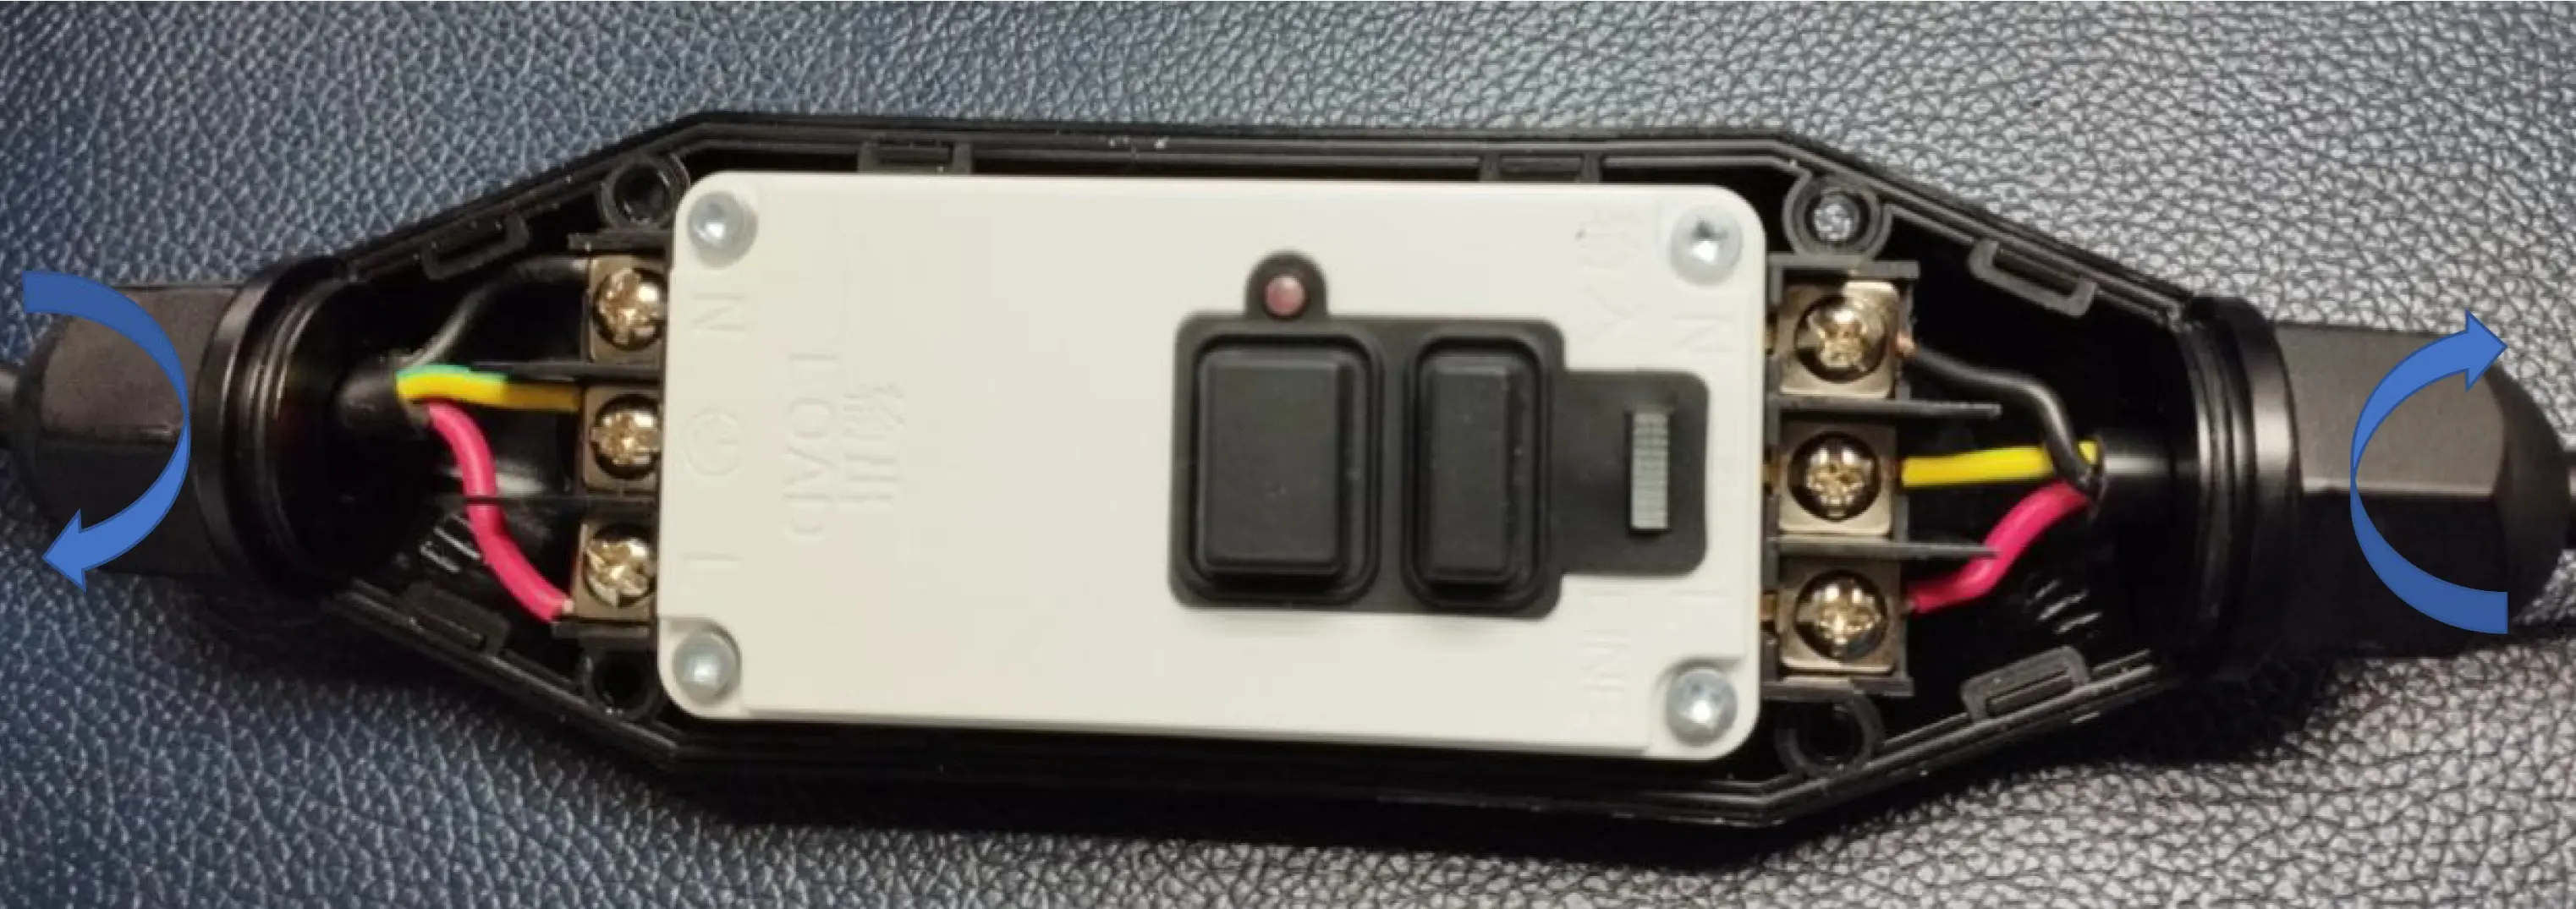
  • Keep the plug-side colour mapping intact: L = Brown, Earth = Yellow/Green, N = Blue.
  • Ensure all tinned ends are uniform and free from stray strands before assembly.
Hindi

किसी भी housing hardware को खोलने से पहले AC plug-side cable को निर्धारित dimensions के अनुसार strip और tin करें।

  • दिए गए dimension diagram का ठीक-ठीक पालन करें: overall prepared section 55 ±2 mm, 3 x 8 ±1 mm stripped ends, 25 ±2 mm upper conductor reference, और 2 x 28 ±2 mm lower conductor reference।
  • Plug-side colour mapping यथावत रखें: L = Brown, Earth = Yellow/Green, N = Blue।
  • Assembly से पहले यह सुनिश्चित करें कि सभी tinned ends समान हों और stray strands से मुक्त हों।
STEP 2

Prepare the charger-side cable

Charger-side cable तैयार करें

Visual Guide

Use this visual as the cable preparation and component-order reference for this step.

English

Strip and tin the charger-side cable to the specified dimensions and tolerance before it is assembled into the housing.

  • Apply the same dimensional tolerance shown on the slide for the charger-side cable preparation.
  • Use the actual charger-side photo as the conductor-colour reference for this step.
  • Keep the tinned conductor ends clean and ready for full insertion into the RCD terminals.
Hindi

Housing में assemble करने से पहले charger-side cable को निर्धारित dimensions और tolerance के अनुसार strip और tin करें।

  • Charger-side cable preparation के लिए स्लाइड पर दिखाया गया वही dimensional tolerance लागू करें।
  • इस चरण में conductor-colour reference के रूप में actual charger-side photo का उपयोग करें।
  • Tinned conductor ends को साफ रखें ताकि वे RCD terminals में पूरी तरह insert हो सकें।
STEP 3
Torque 0.8 to 1.2 N·m

Open the bottom RCD housing

Bottom RCD housing खोलें

Visual Guide

Match the marker numbers, labels, arrows, and torque callouts shown on this visual while completing the step.

1
2
3
4
English

Remove the 4 bottom-housing screws and lift the cover housing upward to expose the internal assembly.

  • Remove all 4 screws from the bottom RCD housing in the sequence shown.
  • Use the specified torque range for this housing hardware: 0.8 to 1.2 N·m.
  • Retain the 4 screws for the final reassembly stage.
Hindi

Bottom housing के 4 screws निकालें और cover housing को ऊपर उठाकर internal assembly को expose करें।

  • दिखाए गए क्रम के अनुसार bottom RCD housing के सभी 4 screws निकालें।
  • इस housing hardware के लिए दिया गया torque range उपयोग करें: 0.8 से 1.2 N·m।
  • अंतिम reassembly चरण के लिए इन 4 screws को सुरक्षित रखें।
STEP 4
Torque 1.5 to 1.6 N·m

Remove the 2 nuts, pressing sleeves, and rubber seals

2 nuts, pressing sleeve और rubber seal निकालें

Visual Guide

Match the marker numbers, labels, arrows, and torque callouts shown on this visual while completing the step.

1
2
English

Open the 2 housing nuts and remove both pressing sleeves and rubber seals from the RCD housing.

  • Remove both nuts that secure the cable-entry hardware on the RCD housing.
  • Remove both pressing sleeves and both rubber seals so they can be reused on the cable ends in the next step.
  • Use the specified torque range for these nuts: 1.5 to 1.6 N·m.
Hindi

RCD housing के 2 nuts खोलें और pressing sleeve तथा rubber seal set को निकालें।

  • RCD housing पर cable-entry hardware को सुरक्षित रखने वाले दोनों nuts निकालें।
  • Pressing sleeve और rubber seal को निकालें ताकि अगले चरण में उन्हें cable पर reuse किया जा सके।
  • इन nuts के लिए निर्धारित torque range का उपयोग करें: 1.5 से 1.6 N·m।
STEP 5

Reuse the nut, pressing sleeve, and rubber seal on both cable ends

दोनों cables पर nut, pressing sleeve और rubber seal को reuse करें

Visual Guide

Match the marker numbers, labels, arrows, and torque callouts shown on this visual while completing the step.

English

Reassemble the removed cable-entry hardware onto the plug-side cable and charger-side cable in the exact order shown for each side.

  • Follow the shown sequence exactly when reinstalling the nut, pressing sleeve, and rubber seal.
  • Repeat the same part order on both the plug-side cable and the charger-side cable.
  • Do not reverse the hardware orientation; the sealing function depends on the correct order.
Hindi

निकाले गए cable-entry hardware को images में दिखाए गए सटीक क्रम में plug-side cable और charger-side cable पर फिर से assemble करें।

  • Nut, pressing sleeve और rubber seal को reinstall करते समय दिखाए गए sequence का बिल्कुल पालन करें।
  • Plug-side cable और charger-side cable दोनों पर उसी part order को दोहराएँ।
  • Hardware orientation को उल्टा न करें; sealing function सही order पर निर्भर करती है।
Assembly order must be preserved Assembly order को सुरक्षित रखना अनिवार्य है

This step controls the sealing and strain-relief function of the housing. If the parts are installed in the wrong order, the cable entry will not clamp or seal correctly.

यह चरण housing की sealing और strain-relief function को नियंत्रित करता है। यदि parts गलत क्रम में लगाए गए, तो cable entry सही तरह clamp या seal नहीं होगी।

STEP 6
Torque 0.75 to 1.0 N·m

Loosen the 6 RCD terminal screws

RCD terminal के 6 screws ढीले करें

Visual Guide

Match the marker numbers, labels, arrows, and torque callouts shown on this visual while completing the step.

1
2
3
4
5
6
English

Open all 6 RCD terminal screws so the plug-side and charger-side conductors can be inserted in the next step.

  • Loosen the full set of 6 terminal screws shown in the image before conductor insertion.
  • Use a terminal torque of 0.75 to 1.0 N·m for secure tightening.
  • Keep the terminal order clearly visible so the next cable-mating step remains unambiguous.
Hindi

अगले चरण में plug-side और charger-side conductors डालने के लिए RCD के सभी 6 terminal screws खोलें।

  • Conductor insertion से पहले image में दिखाए गए 6 terminal screws के पूरे set को ढीला करें।
  • Secure tightening के लिए terminal torque 0.75 से 1.0 N·m रखें।
  • Terminal order स्पष्ट रखें ताकि अगला cable-mating step बिना भ्रम के पूरा हो।
STEP 7

Connect both cable sets to the RCD terminals

Plug-side और charger-side cables को RCD terminals से जोड़ें

LINELOADNGL
Visual Guide

Match the marker numbers, labels, arrows, and torque callouts shown on this visual while completing the step.

1
2
3
4
5
6
English

Mate both cable sets to the RCD exactly as shown, keeping the plug side on LINE and the charger side on LOAD.

  • Connect the plug-side cable to the LINE side marked on the RCD.
  • Connect the charger-side cable to the LOAD side marked on the RCD.
  • Follow the terminal order shown in the image and insert each conductor fully before tightening.
Hindi

दोनों cable sets को बिल्कुल दिखाए गए तरीके से RCD से जोड़ें; plug side LINE पर और charger side LOAD पर रखें।

  • Plug-side cable को RCD पर marked LINE side से जोड़ें।
  • Charger-side cable को RCD पर marked LOAD side से जोड़ें।
  • Image में दिखाए गए terminal order का पालन करें और tightening से पहले हर conductor को पूरी तरह insert करें।
Critical to quality गुणवत्ता के लिए अत्यंत महत्वपूर्ण

This is the key wiring checkpoint of the full assembly. A LINE / LOAD mix-up or incorrect terminal order will make the unit unsafe or non-functional.

पूरी assembly का यह सबसे महत्वपूर्ण wiring checkpoint है। LINE / LOAD mix-up या गलत terminal order unit को असुरक्षित या non-functional बना देगा।

STEP 8
Torque 0.75 to 1.0 N·m

Tighten the 6 RCD terminal screws

RCD terminal के 6 screws कसें

LINELOADNGL
Visual Guide

Match the marker numbers, labels, arrows, and torque callouts shown on this visual while completing the step.

1
2
3
4
5
6
English

Tighten the 6 RCD terminal screws after confirming the cable insertion and LINE / LOAD orientation are correct.

  • Tighten all 6 terminal screws evenly to lock the conductors in place.
  • Use the specified terminal torque: 0.75 to 1.0 N·m.
  • Perform a final visual check on the terminal order before moving to the nut-tightening stage.
Hindi

Cable insertion और LINE / LOAD orientation सही होने की पुष्टि के बाद RCD terminal के 6 screws कसें।

  • Conductors को सुरक्षित रूप से लॉक करने के लिए सभी 6 terminal screws को समान रूप से कसें।
  • निर्धारित terminal torque का उपयोग करें: 0.75 से 1.0 N·m।
  • Nut-tightening चरण पर जाने से पहले terminal order की अंतिम visual check करें।
STEP 9
Torque 1.5 to 1.6 N·m

Tighten the 2 nuts on the cable-entry housing

RCD housing के 2 nuts कसें

Visual Guide

Match the marker numbers, labels, arrows, and torque callouts shown on this visual while completing the step.

English

Tighten both housing nuts after the cable-entry hardware is seated correctly and the terminal work is complete.

  • Tighten both nuts that secure the cable-entry hardware back onto the housing.
  • Use the specified torque: 1.5 to 1.6 N·m.
  • Confirm the sealing hardware remains correctly seated while tightening.
Hindi

Cable hardware सही स्थिति में होने और terminal work पूरा होने के बाद RCD housing के 2 nuts कसें।

  • Cable-entry hardware को housing पर सुरक्षित करने वाले दोनों nuts कसें।
  • निर्धारित torque का उपयोग करें: 1.5 से 1.6 N·m।
  • Tightening के दौरान यह सुनिश्चित करें कि sealing hardware सही तरह seated रहे।
STEP 10
Torque 0.8 to 1.2 N·m

Reassemble the cover housing

Cover housing को दोबारा assemble करें

Visual Guide

Match the marker numbers, labels, arrows, and torque callouts shown on this visual while completing the step.

1
2
3
4
English

Close the housing and reuse the 4 bottom-housing screws to secure the RCD enclosure again.

  • Place the cover back carefully so the internal wiring and the cable-entry hardware are not disturbed.
  • Reuse the 4 screws removed in the housing-opening stage.
  • Tighten the bottom-housing screws to 0.8 to 1.2 N·m.
Hindi

Housing को बंद करें और RCD enclosure को सुरक्षित करने के लिए 4 bottom-housing screws को reuse करें।

  • Cover को सावधानी से वापस रखें ताकि internal wiring और cable-entry hardware disturb न हों।
  • Housing-opening चरण में निकाले गए 4 screws को reuse करें।
  • Bottom-housing screws को 0.8 से 1.2 N·m torque पर कसें।
STEP 11

Retest the reworked charger electrically

Reworked charger का विद्युत परीक्षण दोबारा करें

Visual Guide

Match the marker numbers, labels, arrows, and torque callouts shown on this visual while completing the step.

1
2
3
4
English

Perform the electrical function test again after reassembly so the repaired charger is verified before release.

  • Carry out the same electrical verification required for a reworked charger before it is returned to service.
  • Confirm that the enclosure is fully closed and that the charger functions normally after rework.
  • Record the successful retest according to your production or service documentation process.
Hindi

Reassembly के बाद electrical function test दोबारा करें ताकि repaired charger रिलीज़ से पहले verify हो जाए।

  • Charger को सेवा में लौटाने से पहले reworked unit के लिए आवश्यक वही electrical verification करें।
  • यह सुनिश्चित करें कि enclosure पूरी तरह बंद हो और rework के बाद charger सामान्य रूप से कार्य करे।
  • अपने production या service documentation process के अनुसार successful retest दर्ज करें।